This article contains affiliate links. If you make a purchase through these links, we may earn a small commission at no extra cost to you. Learn more.
The Part Nobody Talks About Until They Have To
A clogged black tank valve will end a trip faster than a flat tire — and it almost always happens to RVers who left the valve open at full hookups. Emptying your holding tanks is the least glamorous part of RV life, but it's also one of the highest-leverage skills to get right. Do it correctly and it's a 10-minute routine you'll stop thinking about. Do it wrong and you're dealing with sensors that read full when the tank is empty, mystery odors, and the dreaded pyramid plug. This guide covers the procedure, how to find stations on the road, and how to keep your tank system working between dumps.
What You're Actually Working With
Your RV manages waste through three separate tanks — and understanding what's in each one matters before you start pulling handles at a dump station.
The fresh water tank holds clean water for sinks, showers, and toilet flushing when you're off hookups. The gray water tank collects drain water from the kitchen sink and shower — soapy water, food particles, nothing worse. The black water tank handles toilet waste and is the one that needs the most careful management.
Tank capacity varies a lot by rig. Travel trailers often run black tanks somewhere in the 25–40 gallon range and gray tanks that run somewhat larger, but check your owner's manual — manufacturers don't standardize this. Monitor the gauges on your control panel, though note that black tank sensors are notorious for reading inaccurately once waste coats the probes. When in doubt, track days of use alongside the gauge.
Know When It's Time to Dump
Most experienced RVers dump when the black tank gauge hits two-thirds full — not when it's maxed out. A tank that's completely full leaves no margin if you're driving a bumpy back road to the station. For practical planning: a couple traveling full-time often fills a 30-gallon black tank in 4–6 days of normal use, faster with kids or guests on board. Gray tanks tend to fill faster because every sink and shower drains into them. Many RVers settle into a rhythm of dumping every 4–5 days as a routine, regardless of what the gauge says.
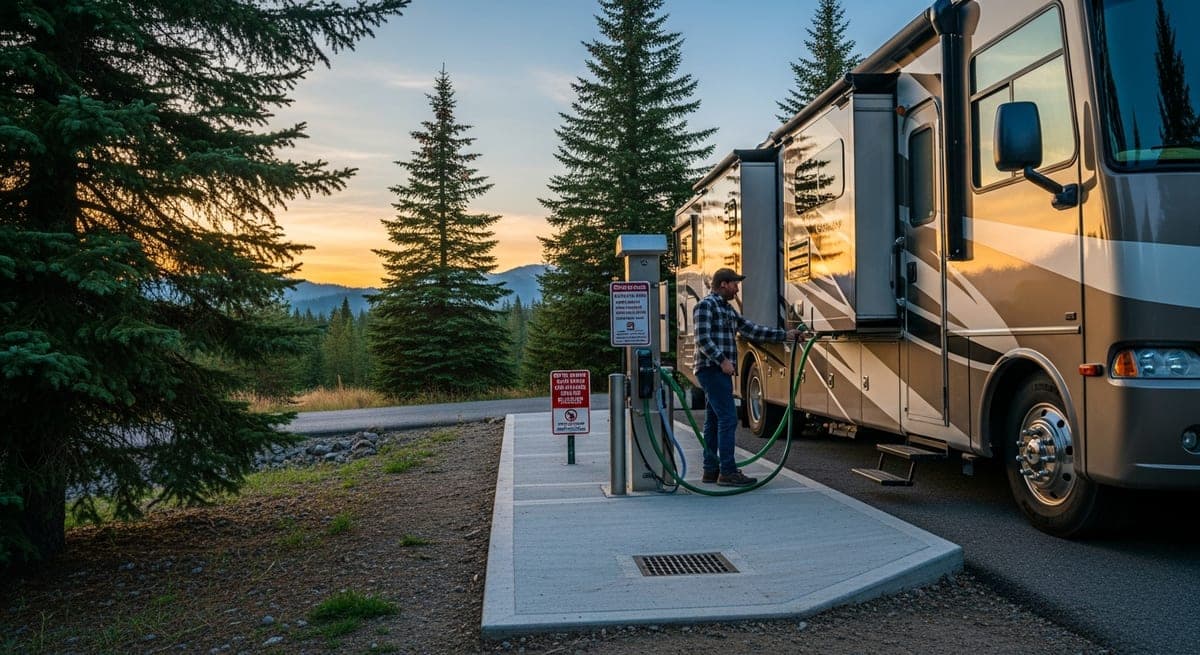
The Dump Station Procedure
- Stage your rig: Pull forward until your sewer outlet — usually on the driver's side toward the rear — lines up within reach of the dump station's ground inlet. Most stations give you 10–15 feet of slack, but tight setups exist. Have your full sewer hose kit out and ready before you move the rig.
- Connect your sewer hose: Attach one end to the RV's bayonet fitting and the other to the dump station inlet. Press and twist to lock both connections before you touch any valves. A loose connection is the only way this job gets messy.
- Open the black tank first: Pull the black tank valve — usually labeled or color-coded — and let it drain fully. Time varies depending on tank size and fill level; no magic number here, just wait until the flow stops.
- Close the black valve, then open gray: Once the black tank is drained, close that valve fully before pulling the gray. Gray water flushes through the hose on its way out, giving it a rinse in the process.
- Flush the black tank if your rig has the fitting: Many RVs include a dedicated black tank flush port — a separate water inlet on the outside of the coach. Connect a hose you keep exclusively for this purpose (never your drinking water hose), run the rinse until the water runs mostly clear from the outlet, then drain again. Rinse until it looks clean rather than timing it.
- Break down and clean up: Close the gray valve. Disconnect the hose keeping both ends angled down. Rinse it at the station's rinse spigot if one's available, cap both ends, and store it in a dedicated bag or compartment. Gloves off, hands washed with soap.
- Treat the black tank: Before leaving, add a couple gallons of water and a dose of black tank treatment through the toilet. Products like Happy Campers Organic Holding Tank Treatment or Unique RV Digest-It support the bacterial breakdown of waste and keep odors under control between dumps.
Where to Find Dump Stations on the Road
- Sanidumps.com and the Sanidump app: The most comprehensive dump station database available, with user-submitted hours, fees, and condition notes. Worth checking before you're desperate, not after.
- Campendium: Strong for locating dump stations near dispersed camping and boondocking areas — especially useful when you're planning your exit route from a remote stay in advance.
- Love's Travel Stops and Pilot/Flying J: Both chains have dump stations at many locations, with fees typically in the $10–$20 range. Searchable on their apps before you hit the road, and generally clean and consistent.
- Campground day-use stations: Most campgrounds let non-guests use the dump station for a fee — usually $5–$15. Call ahead; some restrict access to registered campers only.
- Rest stops: A handful of states — Montana and Wyoming among them — offer free dump stations at interstate rest stops. Availability isn't guaranteed, so treat it as a bonus rather than a plan.
- National Forest and BLM campgrounds: Many managed sites on public land have dump stations; dispersed areas don't. Check the specific campground on Recreation.gov or call the ranger district before committing to a long stay.
Keeping Your Black Tank Honest
- Never leave the black tank valve open when connected to a sewer hookup — liquid escapes and solid waste builds into a "pyramid plug" at the valve that is genuinely difficult to clear. Keep the valve closed and dump periodically, just as you would without hookups.
- Always keep some water in the black tank while it's in use. A dry tank develops odors quickly and waste doesn't break down properly. A flush or two of water after each use is enough.
- If the gauge reads full right after you dumped, waste residue has likely coated the sensors. Fill the tank with water, add a cleaner like Unique Tank Cleaner or a double dose of Happy Campers, drive somewhere bumpy to slosh things around, then dump and rinse again. This usually clears the buildup off the probes.
- Before storing for winter, dump both tanks completely and treat according to your winterization plan — RV antifreeze through the system if you're heading into freeze country.
Related: RV water system guide · RV camping packing list · RV campground etiquette guide
Ready to Plan Your Trip?
Put this knowledge to work. Let our AI build a personalized RV itinerary for your next adventure — or browse community trips for inspiration.